Satya's blog - models/
I've just put together the pictures of the Star Wars Snowspeeder model kit that I put together last April. Like the other Star Wars models, I painted this one white, too. But first I roughly painted the details black so that they would show through later and be more visible. Then I sprayed on the red paint that forms the trim, masked it, and then sprayed the final white paint. The clear canopy was painted black from the inside to give it a tinted look. It's all in the pictures. I think the snowspeeder came out pretty well.
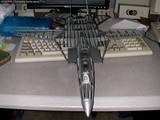
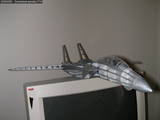
A few months ago I got this Star Wars Darth Vader TIE Fighter by AMT ERTL. I found it in Ross stores.
I unboxed it and immediately (well, okay, I thought about it a bit) sprayed the interiors some kind of silver/metallic/aluminium color. Then I highlighted some of it in black. This was mainly the cockpit interior.
The best was was the painting of the panels with a black paint pen. First draw along the inset border, then fill in the rest. Real easy and fun. And that simple thing makes the model look really good.
After fitting together some fiddly small pieces I put the main parts together. I'd already read reviews about how the parts don't fit well, leaving ugly seams. I don't care, it looks good enough for me. Though I misaligned the 'wings' slightly. It's only noticable when placed on a flat surface. Yes, this thing sits quite well on its wings (I used superglue as well as regular plastic cement on various parts) but it also comes with a pair of silly legs. Even the regular TIE fighter is supposed to be structurally sound enough to park itself on the panels.
The pictures link to the image album, as always.
I got the Megabloks 4-in-1 kit sometime in February and built it in March. Only got around to posting the pictures and blogging about it now. I got it pretty cheap on eBay. Mostly, I bought it for the P51 Mustang model, with the rest as a bonus. I wasn't too interested in the ship, the destroyer. But after building it, the fighter has a whee factor, the chopper is nice to start with, and the destroyer is complicted enough. The Mustang's build was just a little bit boring, but it was nice. On the whole, worth it, especially since it would have cost upwards of $100 to buy them separately -- the 40 I spent would have been for the Mustang alone. Anyway, the pictures are on my site at http://www.thesatya.com/albums/models/mega4in1/.
The eBay seller nicely bagged all the models in separate ziploc bags, with the bigger ones taking two bags. Everything was present but a couple of minor pieces were missing. The chopper was a simple and straightforward build. I like how the flat pieces built up the tail assembly. Similarly standard blocks made up the P51's graceful lines. The Black Eagle is a bog-standard fighter, except that the wings are on hinges to give them that droopy look. The destroyer is a waterline model -- only the stuff above the waterline is built. The hull is hollow, to save on weight and unnecessary pieces. It is open from below and the kit contains 4 wheels, which I did not use. presumably this is so you can run it on the floor while making appropriate noises with the mouth. The design is ingeniously built out of offset standard bricks to make a graceful hull. The P51 is a thing of beauty, and so is this model. It is large and heavy and sits atop a wardrobe. It had so many grey blocks that I discovered a new way to sort the pieces -- by making big homogenous blocks of identical pieces, say all the 2x4 blocks together, I can find them faster. This model has the most realistic under-carriage of any similar kit. It doesn't retract but it does have springs. Most of my comments about individual models are in each picture's description. But overall, typically for Megabloks, the pieces were quite standard with few special parts. Totally worth the price I paid.
Oh yeah, completed:
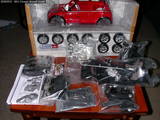
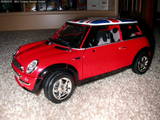
A while back, I bought a cheap
Mini Cooper
model.
It was surprisingly complicated,
lots of parts,
and being die-cast
some of the parts didn't quite fit but it looks good in the pictures.
The detailed interiors are nice without having too much of
fiddly-small-parts syndrome.
Here are the parts, and then a pic of the finished model:
Last updated: Apr 19 2006 08:11
The LEGO Star Wars Ultimate Collection Series Millenium Falcon
has some box art which indicates an alternate design model.
I have no idea what it's called and the instructions don't include it.
I couldn't find anything on the net except what appear to be studio pictures
of it, which are the same as what's on the box.
So I decided to build it going by the picture on the box, which is hard because it's only from one angle and you can't tell what's under it. I tried to remain true to the box art but there are slight deviations. The under-side, especially, is complete guess-work. Of course, I took pictures: Millenium Falcon alternative model. I won't post a build log here as most of what I could say (now, months after building it) is already in the picture descriptions.
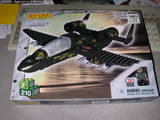
Since they were cheap, I bought a couple of "Best-lock" brand models. Neither
of them had a name, but one is some sort of APC and the other is clearly
an A-10 Warthog. I got them for about $5 each, and each has 210 pieces and is
for ages 7+.
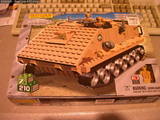
The APC is a piece of... something useless, but I got it because the inside box cover looked interesting. It's got movable tracks, after all. The contents of the boxes are familiar: plastic baggies, instruction sheets (each with about 10-15 steps) and a label sheet which I didn't use. Note the big piece of warthog keel in the first link. The APC also has a big keel piece. That theme persists throughout -- big pieces that LEGO or Megabloks would have built out of smaller standard pieces. Makes my complaints about LEGO's non-standard parts pale in comparison. The instructions were kinda nice. The usual parts list per step, and at each step the current build was in "real" colors and the rest of the model was faded out. Helps with the clarity. The APC was a quick build because of those pieces. A LEGO model would have had the tracks go on at or near the end; this one, the tracks were the first thing on. Within minutes I had the basic deck, and the rest went quickly: 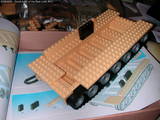
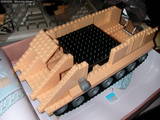

There's a small black platform inside -- built out of several plate-pieces, not one, on which the minifigs awkwardly stand. The constructions feels flimsy at first as there is no interlocking like you'd expect, but as we reach the top there is a little more interlocking. The pieces don't "snap" satisfactorily so there's little feedback of a good connection. But the connection, once made, is sturdy enough. The completed model is as strong as an equivalent other-brand model. That is, the guns and other greeblies tend to fall off but the basic shape is durable. The APC's tracks move and the back opens. That's a bit sucky, as the hinges tend to disconnect. It's still a nice enough military playset thing. The Warthog was a little more interesting, being an aircraft and not a box. The hull is one piece, and so are the fins, but that is to be expected. the rest is pretty nice. It has some shaped pieces for the nose but the cockpit body (behind the canopy) is built from individual "real" pieces. 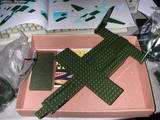
The engines are very nice, not one-piece, and they're hinged to move up and down. Even the wheels are realistic -- Megabloks' F16 had worse landing gear (although the overall model was better). 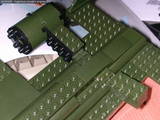
My one complaint with the Warthog is that the wing connections are weak; the tip piece tends to fall off. A little reinforcement would help but would be bad for the look, so I can live with it. This model was worth the price. Pictures: 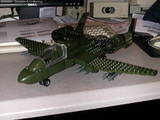
Oh, and the APC comes with 3 mini-figures and the Warthog comes with one. Last updated: Feb 18 2006 09:57
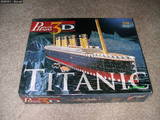
Puzz3D makes nice three-dimensional jigsaw puzzles.
You put together flat sections of foam-backed puzzle pieces,
then assemble them into a 3-D model.
So I bought the Titanic in December 2005 on eBay.
The box arrived very nicely wrapped:
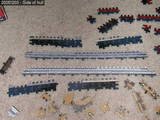
The flat bits of the funnels, the hull and the deck were assembled in a couple of days. The brown bits are the deck pieces. The funnels, of which there are four -- I think one was decorative on the original -- are four-sided (oval in the original?) so there are sixteen of those sections, each assembed out of three pieces. Took a while to sort them out. 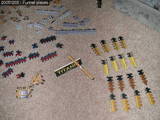
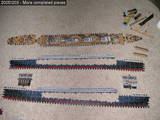
Here are all the flat bits completed, and assembly of the 3D model can begin. 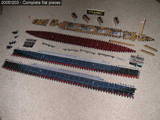
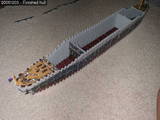
Here's the 3D model. The hull is kinda hard to hold together while pressing bits of foam jigsaws. Hence the inner detail; the 'bulkhead' sections fore and aft as seen in the first picture below: 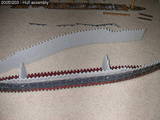
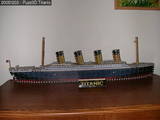
And the fully-assembled Puzz3D Titanic model:
(The links within the text contain more pictures, and the whole thing is of course in my picture gallery.)
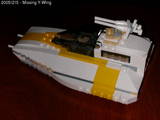
The Y-Wing is complete:
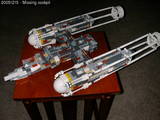
But wait, where's the cockpit? Well, there are still some parts left, and we get: 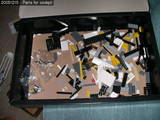 =>
=>
The remaining parts include a stand as well. So here's the complete LEGO Star Wars Y-Wing: 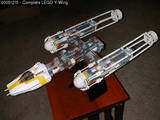
Of course, all the pictures are in my picture gallery — including full-size ones.
The LEGO Y-Wing's Y-legs consist of, from front to back,
In previous posts we saw the construction of the engines struts, nozzles, etc. All that's left here are the sensor domes and mounts. That's what I call them because I don't know what they really are, and I'm too lazy to go look it up. I'd have to change what I called them everywhere. The sensor dome, dome mounts, and main engine fit together with Technic pins. The nozzle attaches to the engine with a 90-degree-shifted stud area. The struts, as seen before, attach at eight points using Technic technology. Here are the dome mounts, with tilting plates for the detailing. The domes are made entirely of standard pieces. Bricks, flats, no-stud flats, Technic (holed bricks), but all standard. Except the dome itself, which by the way, attaches on a hinge. 
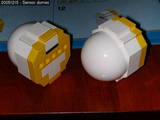
Here are the detail pieces that attach to the tilting plates on the dome mount. They also bump the parts count. The other picture shows how everything comes together. 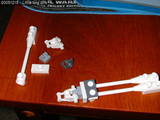
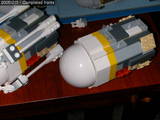
The completed engines are shown here. Notice the Technic-pin mounting on the left. You can also see the places where the struts are going to be mounted. The Technic-style holes along the side are for connection to the wing roots. 
And finally, the completed Y-legs. You get a sense of scale from my thumb there. 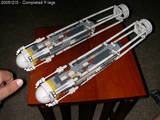
Building the main parts of the LEGO Y-Wing's body is
tedious work, but the engine strut-work is
something different.
First we build the back end:
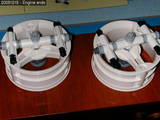
Then we build the rest out of long technic axles covered with a unique round sheath. Since there are two engines, each engine has four struts and each strut is three Technic axles long, we need twenty-four axle pieces. The instructions show how to build one strut and multiply that by four to build one engine and multiply that by two, but I built all eight struts at once. Here are some of the bits used — the bag contains the sheaths: 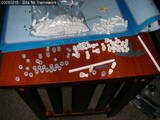
Each strut is three axles and the sheaths are pushed onto it. That was the hardest part. At various intervals we have the connecting pieces and some tee-pieces to attach the struts to the engine: 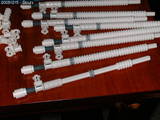
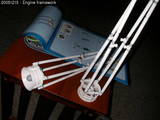
Here are all eight struts and the completed framework. It attaches to the engine at eight points using the tee-shaped pieces, four of which are clearly visible half-way along the vertical one: 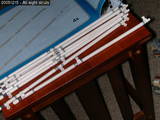
|
In this folder:
|